
Every experience can be designed to be better; this is my process.
STEP 1: RESEARCH AND UNDERSTANDING
My process adapts to each unique project I work on. The core of my process remains consistent and it always starts with user research. Below are some examples of different tasks and activities I use to empathize with users and make sure we are solving for the right problems.
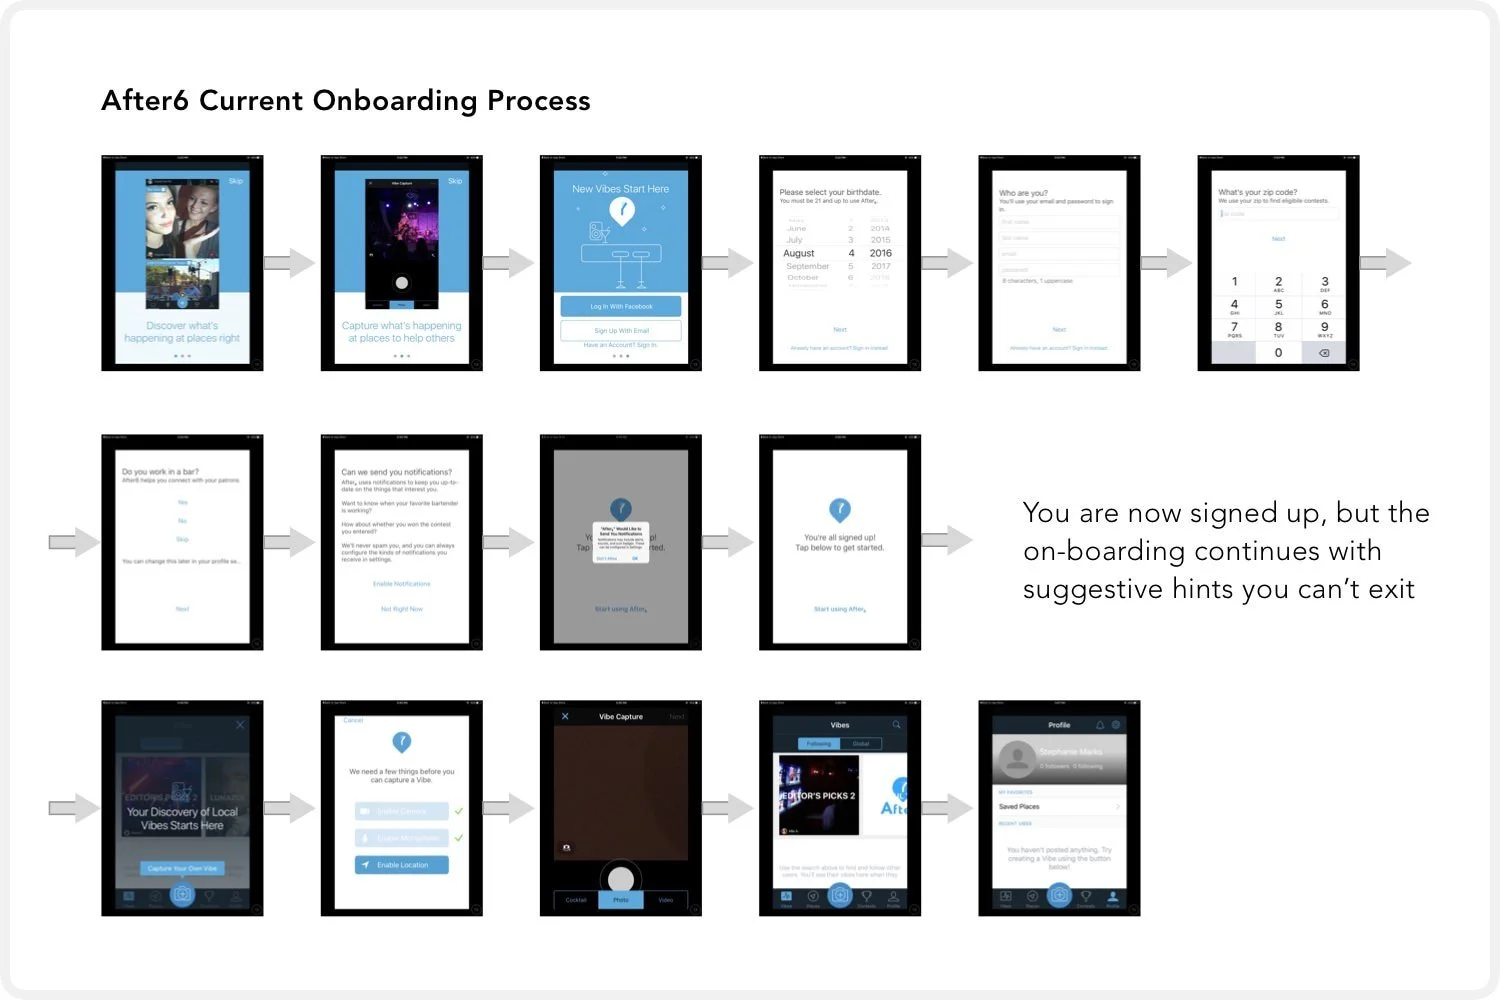
CURRENT SITE AUDIT
It begins with an audit of what currently exists, be it a back-of-napkin idea or a fully realized product. I start with a full analysis of the strengths and weaknesses of the project as a baseline for future work.
OBSERVING AND INTERACTING WITH USERS
Because empathy is core to the design process, I believe that spending time with users, ideally in the environment they use or want to use your product in, is critical to success. From zero to a million users, direct observation, qualitative interviews, and interactions are core to creating world-class products.

COMPETATIVE & COMPARATIVE ANALYSIS
Very few ideas exist in a bubble, and this step places me in the role of a prospective user in order to see where the most value can be delivered by understanding the decision process from awareness to retention & where similar products in the market stand.

USER SURVEYS & EMPATHY SESSIONS
To start getting the baseline of discovery down, I use surveys to get user demographic information in a quick and efficient way & follow it up by meeting with users to get real feedback by asking direct questions. Specifically the 5 w’s - who, what, when, where, and why? Sometimes I find that users are already familiar with the product and can get direct quotes from them on why they have or have not been using it - which can be a springboard for the next steps in the research process.

STAKEHOLDER INTERVIEWS
All businesses have needs and I make sure to put an extra emphasis on not only satisfying those needs, but also finding any extra hidden gem opportunities there may be. I’m looking for answers to these types of questions: What features are an absolute must for the stakeholders? What is the abandonment rate and when is it happening? What things do customers complain about or ask for most often?
I use these insights to continue to direct the research process and to ensure that the design changes I eventually make will add value to the business & those behind it.

AFFINITY MAPPING
Using sticky note, or more often an Airtable workspace, this is when I start to compile all of the feedback that’s been gathered so far and group it into themes to see the overall issues with the product. This really helps showcase the main problems users are facing, where new potential opportunities may lie, and which parts of the product are.

CREATING DATA BASED USER PERSONAS
My next step is to clearly identify user needs, pain points, & opportunities and utilize all of the research data gathered so far to formulate personas. I use these to help align the entire team in the same direction: getting everyone focused on negating the user’s frustrations, enhancing their motivations, and helping them achieve their goals. By making the problem into a story with a relatable person attached, it turns into something very tangible & easy to empathize with, even if you aren’t a designer.

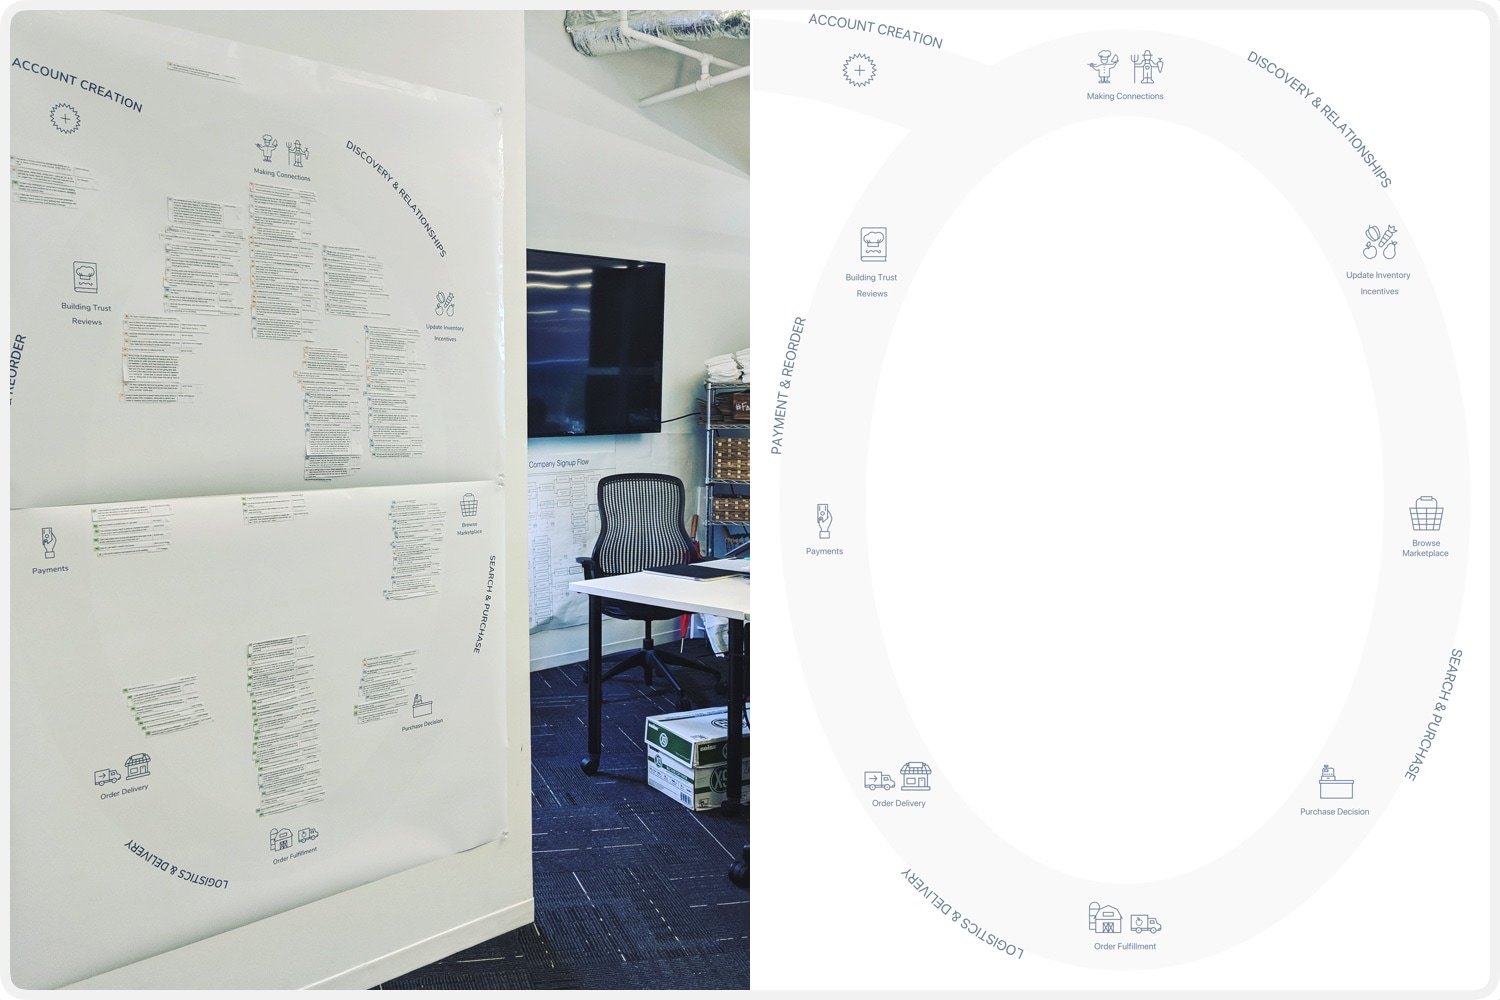
CUSTOMER JOURNEY MAP
Once the pain points, needs, and wants for both the business and our user personas are clearly understood - it’s time to start tracking how that interacts with users current flow; from their very first interaction with your company to being a frequently returning user. Mapping it out in this way allows me to clearly see which part(s) of the journey are stopping customers from getting to the end result the business wants them to be getting to. Fixing these roadblocks is the best and quickest path to adding tangible value to the product - both for the user and the business.
OTHER TASKS IN THIS STEP MAY INCLUDE: data & research synthesis, defining user scenarios, completing a task analysis, compiling a project plan, and defining success metrics.
STEP 2: DATA ANALYSIS AND IDEATION
Using the data gathered about the users needs, pain-points, and potential impactful opportunities - I define a problem statement, goals, and KPIs for the project. This step is all about finding simple solutions to complex problems.
SOLUTION BRAINSTORMING
Once a problem is defined, it’s time to think of all the ideas for potential solutions. I think this is best done with a team all sitting in a room together bouncing ideas around & adding onto each others ideas. It usually ends with a bunch of sketches and sticky notes on the wall.

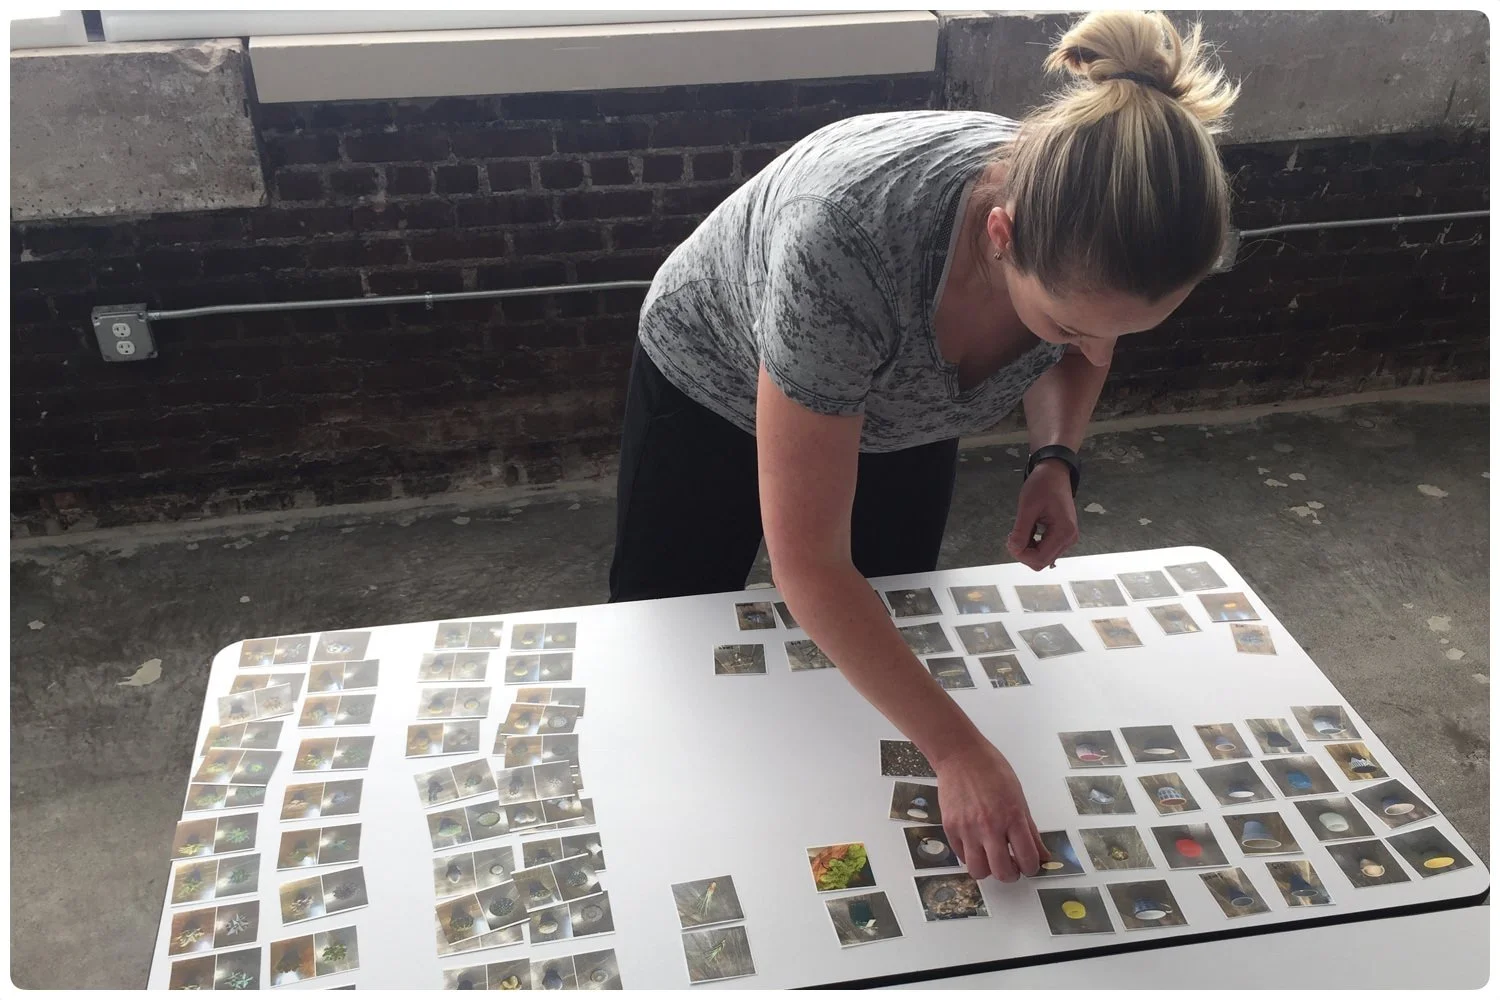
INFORMATION ARCHITECTURE
Information architecture is important because when it’s done right, users are able to very quickly locate exactly what they are looking for. Naming consistency and good categorization are fundamental. I often utilize card sorting to figure out how users mentally map the information & then ensure the product is built to match.
SITE MAPS
The next thing I usually do is create a sit map, or a new one, for the website or product I’m working on. It’s necessary to nail down early in the process to help explain whats going to change and why it makes sense to lay out things in this way. If there are different user roles or permissions, I like using symbols and colors to label those on site maps and user flows.

USER FLOWS
User flows can take many forms for different purposes, but I think it’s best to pick a certain set of tasks for a specific persona, and then map out that flow accordingly. I always like to make one clean version for the non-technical team and then additional ones for the developers/product teams with error states and other more nuanced information.

OTHER TASKS IN THIS STEP MAY INCLUDE: content strategy, building taxonomies, doodling, and mind mapping.
STEP 3: TESTING & ITERATIONS
Testing early and often is important to ensure that the solutions being thought up are going to be the best ones to solve the problem. Prototypes are made without a single line of code, so they are fast and relatively cheap to make. Testing at multiple levels of fidelity gives me the ability to iterate and really perfect the designs before development ever has the chance to waste time and money building the wrong solutions.
RAPID SKETCHING
Sketching can be done basically anywhere and is the best way for me to sift through a lot of different ideas quickly in order to see what the best potential solutions could be. I use sketches to visually communicate ideas with the team in order to generate early feedback & flesh out any technical limitations that may interfere down the road.

PAPER PROTOTYPE TESTING IDEAS
Paper prototyping is a great way to test multiple solutions quickly. Using sketches i’ve already made, I can make multiple paper prototypes in a matter of minutes.
Testing with these allow me to get users involved very early in the design process to uncover usability issues, validate design decisions based on actual user reactions, and iterate on/combine ideas based on realtime feedback to get to the right version.

WIREFRAMES
Using the findings, sketches turn unto wireframes to add more specifics and details on how this idea could work. These are useful for a variety of reasons - not only can I test this new version with users, but I can also run it by the developers if they have not already been involved. This is a great time to learn about any potential issues, giving us time to collaborate on a suitable alternative.

MEDIUM FIDELITY PROTOTYPE, TESTING, & ITERATIONS
During this phase of testing, I’m looking to see if the new user flows make sense, the products overall ease of use, and to narrow down functionality. Using either one idea or A/B testing with multiple ideas, I give the user a series of tasks based on the user flow of a single persona to see if they can intuitively complete it without difficulty. This allows me to watch and take notes about each decision the user makes along the way and any issues they have, I use these insights to iterate and make the designs even better.

HIGH FIDELITY DESIGN
After iterating, I start to work on really nailing down the visual and interaction design aspects of the new idea. This involves everything from (but not limited to) updating to on-brand typography and color schemes, to deciding how buttons and dropdowns will behave, and thinking about edge cases & empty states. This is when the final solution really starts to come together; all decisions have been made, just clean designs are left and I can begin turning them into a final prototype.

HIGH FIDELITY PROTOTYPE
These are relatively quick to make and are useful in so many ways. I use high fidelity prototypes to show the team & investors new product direction, to show developers exactly what to build, and to keep testing with our users to validate the final designs.

OTHER TASKS IN THIS STEP MAY INCLUDE: user testing & repeating entire step if necessary
STEP 4: DESIGN & RELEASE
This step is all about working with the development team to get the product built correctly and marketed well before it’s put out into the wild.
DEFINING A STYLE GUIDE
A style guide is kind of like a list of decisions that I made in order to focus the way that brands present themselves in the product. I’m effectively creating a consistent set of guidelines for all team members to follow to ensure that the brand is always being represented in the right light. I use online tools that allow me to share a living style guide with the team, so if anything changes they are the first to know.

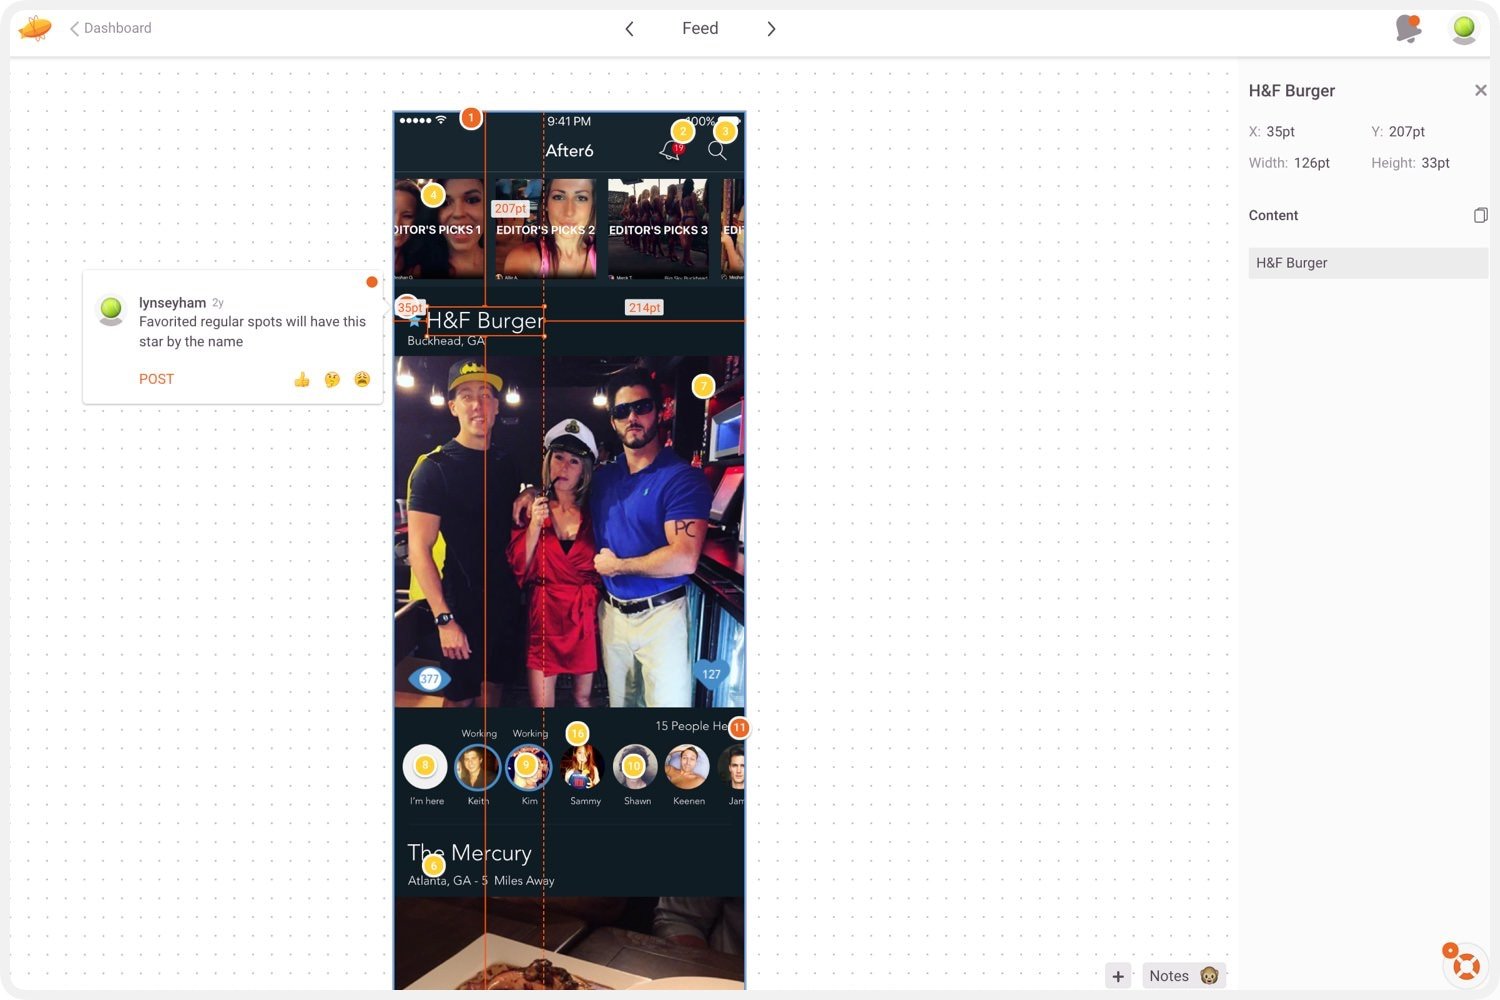
ANNOTATED WIREFRAMES
Annotated wireframes not only help me ensure that I have thought through every edge case and all possible outcomes for the user, but also to help me clearly articulate the specifics of the new design. I use these to show the development team exactly what we want the product to do in every situation. This ensures there is no confusion, that we are all always on the same page, and that the solution is being build correctly.

DELIVER DESIGN SPECS TO DEVELOPERS
Next I get together everything the developers will need to accurately implement the new designs and work with the team to break it down into manageable tasks. I deliver pixel perfect, browser-based, marked up screens that can be updated anytime. It not only provides the development team with correct colors, shadows, and fonts, but also the appropriate unit of measurements for all the different web browsers, iOS, and Android resolutions. On each task i link the related screens, attach a video overview of the high fidelity prototype to showcase the interaction, and provide a written summary with any other useful information.
MARKETING MATERIALS
Sometimes clients ask for additional help in reaching past their product and into marketing. I help deliver value to the sales process by creating clean, visually enticing/consistent marketing materials - from emails to mugs to in-store banners or even branded user gifts.

QA & MORE TESTING
My commitment to excellence in design extends past the product release, ensuring that the finished productcreates deliht in the hands of users and delivers results to the team.

STEP 5: WATCH & REPEAT
I watch users interacting with the new version of the product on their own terms and in their own way. I start empathizing with them again to see if we solved their problems and test to see how effective the new designs are against the KPI’s defined earlier in the process. After that, it’s time to repeat the process and start working to solve the next highest priority problem.
SEE THE RESULTS!


